In your terminal, create a new folder called mybulma, navigate to it, then type the following command:
With webpack
Use Bulma with webpack
1. Create a package.json file
#
npm init
This will launch an interactive setup to create package.json. When prompted for an entry point, enter webpack.config.js.
2. Install the dev dependencies #
Install the packages required to parse and build your CSS:
npm install bulma --save-dev
npm install css-loader --save-dev
npm install extract-text-webpack-plugin@next --save-dev
npm install mini-css-extract-plugin --save-dev
npm install node-sass --save-dev
npm install sass-loader --save-dev
npm install style-loader --save-dev
npm install webpack --save-dev
npm install webpack-cli --save-dev
Your package.json should look like this at this point.
{
  "name": "mybulma",
  "version": "1.0.0",
  "main": "webpack.config.js",
  "license": "MIT",
  "devDependencies": {
    "bulma": "^0.7.2",
    "css-loader": "^1.0.0",
    "extract-text-webpack-plugin": "^4.0.0-beta.0",
    "node-sass": "^4.9.2",
    "sass-loader": "^7.0.3",
    "style-loader": "^0.21.0",
    "webpack": "^4.16.0",
    "webpack-cli": "^3.0.8"
  }
}
3. Create a webpack config (Webpack <= 3) #
Create a webpack.config.js file:
const path = require('path');
const ExtractTextPlugin = require("extract-text-webpack-plugin");

module.exports = {
  entry: './src/index.js',
  output: {
    path: path.resolve(__dirname, 'dist'),
    filename: 'js/bundle.js'
  },
  module: {
    rules: [{
      test: /\.scss$/,
      use: ExtractTextPlugin.extract({
        fallback: 'style-loader',
        use: [
          'css-loader',
          'sass-loader'
        ]
      })
    }]
  },
  plugins: [
    new ExtractTextPlugin('css/mystyles.css'),
  ]
};
This setup takes the src folder as input, and outputs in the dist folder.
3.5. Create a webpack config (Webpack 4) #
Create a webpack.config.js file:
const path = require('path');
const MiniCssExtractPlugin = require('mini-css-extract-plugin')

module.exports = {
  entry: './src/index.js',
  output: {
    path: path.resolve(__dirname, 'dist'),
    filename: 'js/bundle.js'
  },
  module: {
    rules: [{
      test: /\.scss$/,
      use: [
          MiniCssExtractPlugin.loader,
          {
            loader: 'css-loader'
          },
          {
            loader: 'sass-loader',
            options: {
              sourceMap: true,
              // options...
            }
          }
        ]
    }]
  },
  plugins: [
    new MiniCssExtractPlugin({
      filename: 'css/mystyles.css'
    }),
  ]
};
This setup takes the src folder as input, and outputs in the dist folder.
4. Create a src folder
#
Create a src folder in which you add a file called index.js with the following content:
require('./mystyles.scss');5. Create a Sass file #
Inside the same src folder, add a file called mystyles.scss:
@charset "utf-8";
@import "~bulma/bulma";
Make sure to write the correct path to the bulma folder.
6. Create a dist folder
#
Create a dist folder in which you add a css folder, and a js folder. Leave these last two folders empty. Their content will be generated by the webpack build.
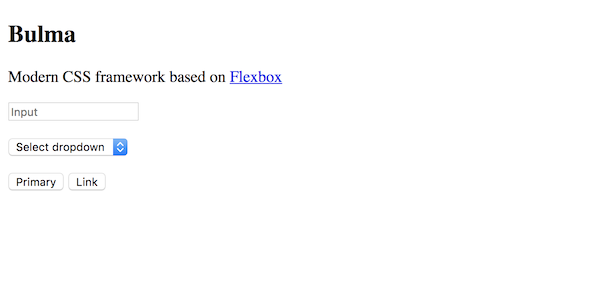
7. Create an HTML page #
Create an HTML template which uses several Bulma components.
<!DOCTYPE html>
<html lang="en">
  <head>
    <meta charset="utf-8">
    <meta http-equiv="X-UA-Compatible" content="IE=edge">
    <meta name="viewport" content="width=device-width, initial-scale=1">
    <title>My custom Bulma website</title>
    <link rel="stylesheet" href="css/mystyles.css">
  </head>
  <body>
     <h1 class="title">
        Bulma
      </h1>

      <p class="subtitle">
        Modern CSS framework based on <a href="https://developer.mozilla.org/en-US/docs/Web/CSS/CSS_Flexible_Box_Layout/Basic_Concepts_of_Flexbox">Flexbox</a>
      </p>

      <div class="field">
        <div class="control">
          <input class="input" type="text" placeholder="Input">
        </div>
      </div>

      <div class="field">
        <p class="control">
          <span class="select">
            <select>
              <option>Select dropdown</option>
            </select>
          </span>
        </p>
      </div>

      <div class="buttons">
        <a class="button is-primary">Primary</a>
        <a class="button is-link">Link</a>
      </div>
  </body>
</html>
Save this file as mypage.html in the dist folder.
Notice the css/mystyles.css path for your stylesheet. This will be the location of the CSS file we will generate with Sass.
Open the page in your browser:
8. Add node scripts to build your bundle #
In package.json, add the following:
"scripts": {
  "build": "webpack --mode production"
},
To test it out, go in your terminal and run the following command:
npm run build9. Add your own Bulma styles #
Replace the content of the mystyles.scss file with the following:
@charset "utf-8";

// Import a Google Font
@import url('https://fonts.googleapis.com/css?family=Nunito:400,700');

// Set your brand colors
$purple: #8A4D76;
$pink: #FA7C91;
$brown: #757763;
$beige-light: #D0D1CD;
$beige-lighter: #EFF0EB;

// Update Bulma's global variables
$family-sans-serif: "Nunito", sans-serif;
$grey-dark: $brown;
$grey-light: $beige-light;
$primary: $purple;
$link: $pink;
$widescreen-enabled: false;
$fullhd-enabled: false;

// Update some of Bulma's component variables
$body-background-color: $beige-lighter;
$control-border-width: 2px;
$input-border-color: transparent;
$input-shadow: none;

// Import only what you need from Bulma
@import "../node_modules/bulma/sass/utilities/_all.sass";
@import "../node_modules/bulma/sass/base/_all.sass";
@import "../node_modules/bulma/sass/elements/button.sass";
@import "../node_modules/bulma/sass/elements/container.sass";
@import "../node_modules/bulma/sass/elements/title.sass";
@import "../node_modules/bulma/sass/form/_all.sass";
@import "../node_modules/bulma/sass/components/navbar.sass";
@import "../node_modules/bulma/sass/layout/hero.sass";
@import "../node_modules/bulma/sass/layout/section.sass";
Rebuild the CSS to see the result:
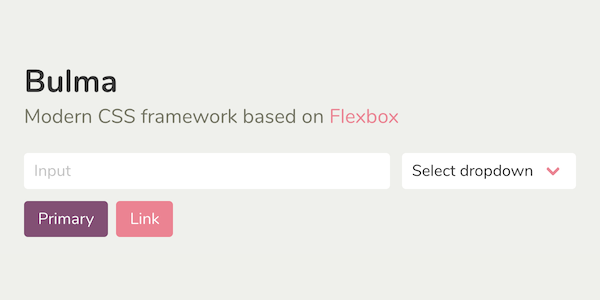
And voilà! You've managed to install and customize Bulma.
![]()
This page is open source.
Noticed a typo? Or something unclear?
Improve this page on GitHub